
Search Knowledge Base by Keyword
-
Introduction
-
Fundamentals
-
Favorites
-
Dashboards
-
Attachments
-
Reports
-
- Available Reports
- All Asset Types
- Application Certification Status
- Application Discovery
- Application Group Analysis
- App Group to SCCM Collection Analysis
- Application Install Count
- Application License Management
- Application Usage
- Asset Count by Property
- Asset Links Count by Asset Type
- Build Sheet
- Computer User Assignment
- Migration Readiness (Basic)
- Migration Readiness (Complex)
- O365 License Management
- O365 Migration Readiness
- SCCM OSD Status
- Scheduled Computers by Wave
- Scheduled Users by Manager
- User Migration Readiness
- VIP Users
- Wave & Task Details
- Wave Group
- Windows 10 Applications
- Patch Summary
- Delegate Relationships
- Show all articles ( 12 ) Collapse Articles
-
Self Service
-
Workflow
-
Assets
-
- View Asset
- Asset Properties
- Images
- Notes
- Waves
- Tasks
- Attachments
- History
- Rationalization
- QR Code
- Linked Assets
- SCCM Add/Remove Programs
- Altiris Add/Remove Programs
- Related Assets
- Relationship Chart
- Permissions
- Show all articles ( 1 ) Collapse Articles
-
Event Logs
-
Users & Groups
-
Asset Types
-
Charts & Dashboards
-
Options
-
Module Settings
-
API & Stored Procedures
-
Administration
Jobs
< Back
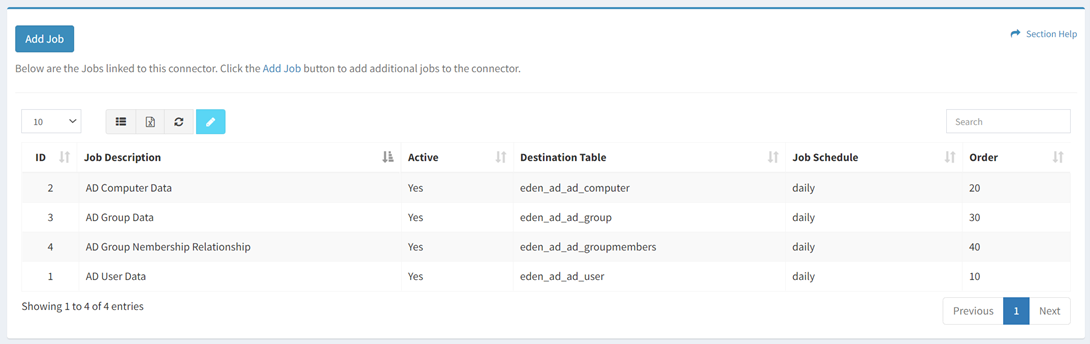
The Jobs tab provides the ability to manage connection jobs.
Available operations:
- Add jobs to the connection by clicking on the Add Job button
- View the jobs associated with the connection
- Columns available
- ID – System Id of the job
- Job Description – Description of the job
- Active – Whether the job is active (Yes, No)
- Allow Empty Table (hidden by default) – Whether an empty table is allowed (Yes, No)
- Destination Table – Name of the destination table (e.g., my_table_cm_computer)
- Data Identity (hidden by default) – Identity of the data for dashboards (e.g., cm_computer)
- AD – Identify data to query from a table
- Static Definition (hidden by default) – Whether the table definition is static (Yes, No)
- Job Schedule – Frequency the job will run (Weekly, Daily, Hourly, Custom)
- Data Processing (hidden by default) – Processing of the data
- Future field to be used for running a process against data
- Fields to Index (hidden by default) – Fields to index
- Data Selection (hidden by default) – Connector specific data selection command of the job
- Request Filter (hidden by default) – Fields to filter from the job (AD only)
- Request Fields (hidden by default) – Fields requested by the job (ServiceNow only)
- Request Sort By (hidden by default) – Field to sort the job by (AD only)
- Request Limit (hidden by default) – Request limit of the job (Druva, ServiceNow and CrashPlan only)
- Order – Order job should run
- Connection Label (hidden by default) – Unique label to prepend to all database tables
- Columns available
- Edit jobs by selecting a job (row) and clicking the Edit Job button on the toolbar
- Deleting jobs is currently not supported
- You can also change the number of visible rows in the table, set column visibility, export to CSV or Excel, refresh the table and search for text
New Job
From the Jobs tab, you can create new jobs. To create:
- Click the Add Job button to bring up the New Job dialog
- Enter the properties of the new job
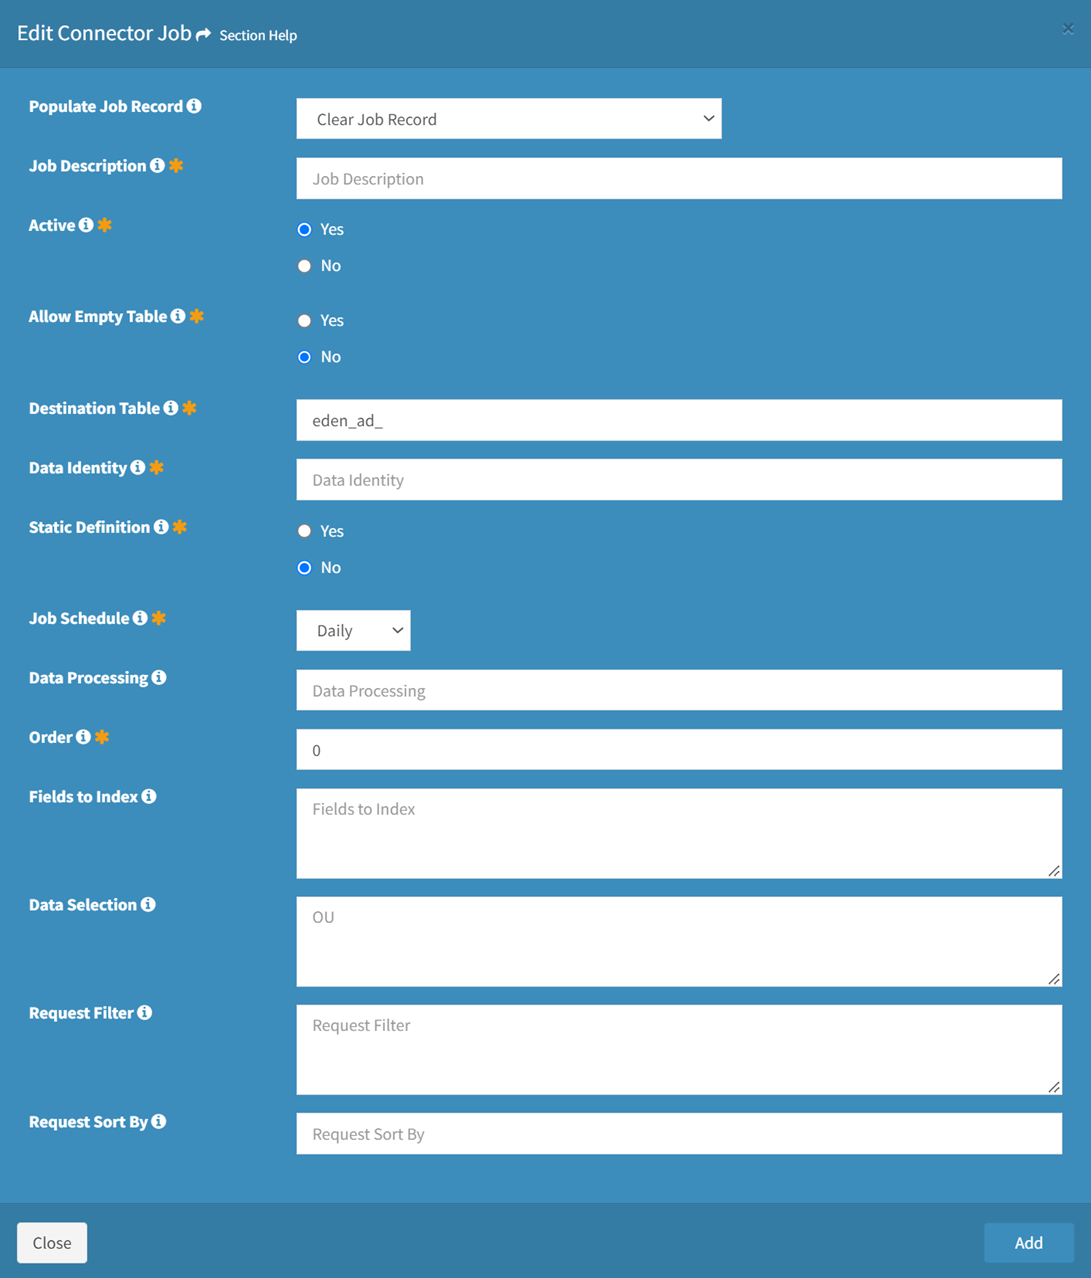
- Populate Job Record – Choose how to populate the job (optional)
- Clear Job Record – Start with an empty record
- Use Template – Start with a template job
- Clone Job – Start with a clone from an existing job
- Job Description – Description of the job (required)
- Active – Choose if job is active (required)
- Allow Empty Table – Choose if an empty table is allowed (required)
- Destination Table – Name of the destination table (e.g., my_table_cm_computer) (required)
- Data Identity – Identity of the data for dashboards (e.g., cm_computer) (required)
- AD – Identify data to query from a table
- Static Definition – Choose if the table definition is static (required)
- Job Schedule – Choose the frequency the job will run
- Weekly
- Daily
- Hourly
- Custom
- Data Processing – Processing of the data (optional)
- Future field to be used for running a process against data
- Order – Choose the order the job will run at the designated frequency (required)
- Fields to Index – Fields to index (optional)
- Data Selection – Connector specific data selection command of the job (optional)
- Request Filter – Fields to filter from the job (AD only) (optional)
- Request Fields – Fields requested by the job (ServiceNow only) (optional)
- Request Sort By – Field to sort the job by (AD only) (optional)
- Request Limit – Request limit of the job (Druva, ServiceNow and CrashPlan only) (optional)
- Populate Job Record – Choose how to populate the job (optional)
- Click the Add button when finished to create the job. You will be redirected back to the Jobs tab. Click the Close button to cancel the operation.
- The new job function is only available to users in the Administrator security group
Edit Job
From the Jobs tab, you can edit jobs. To edit:
- Select a job (row) to edit
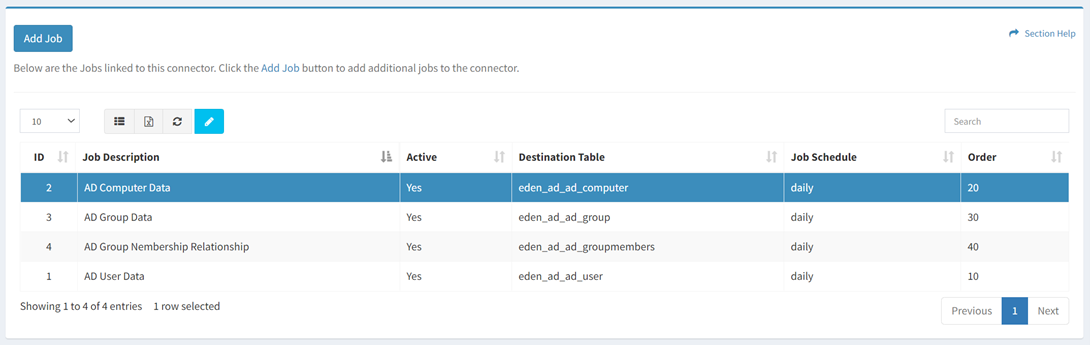
- Click the Edit Job button on the toolbar to bring up the Edit Job dialog

- The edit button is grayed out unless a job (row) is selected


- The edit function is only available to users in the Administrator security group
- The edit button is grayed out unless a job (row) is selected
- Edit the properties of the job
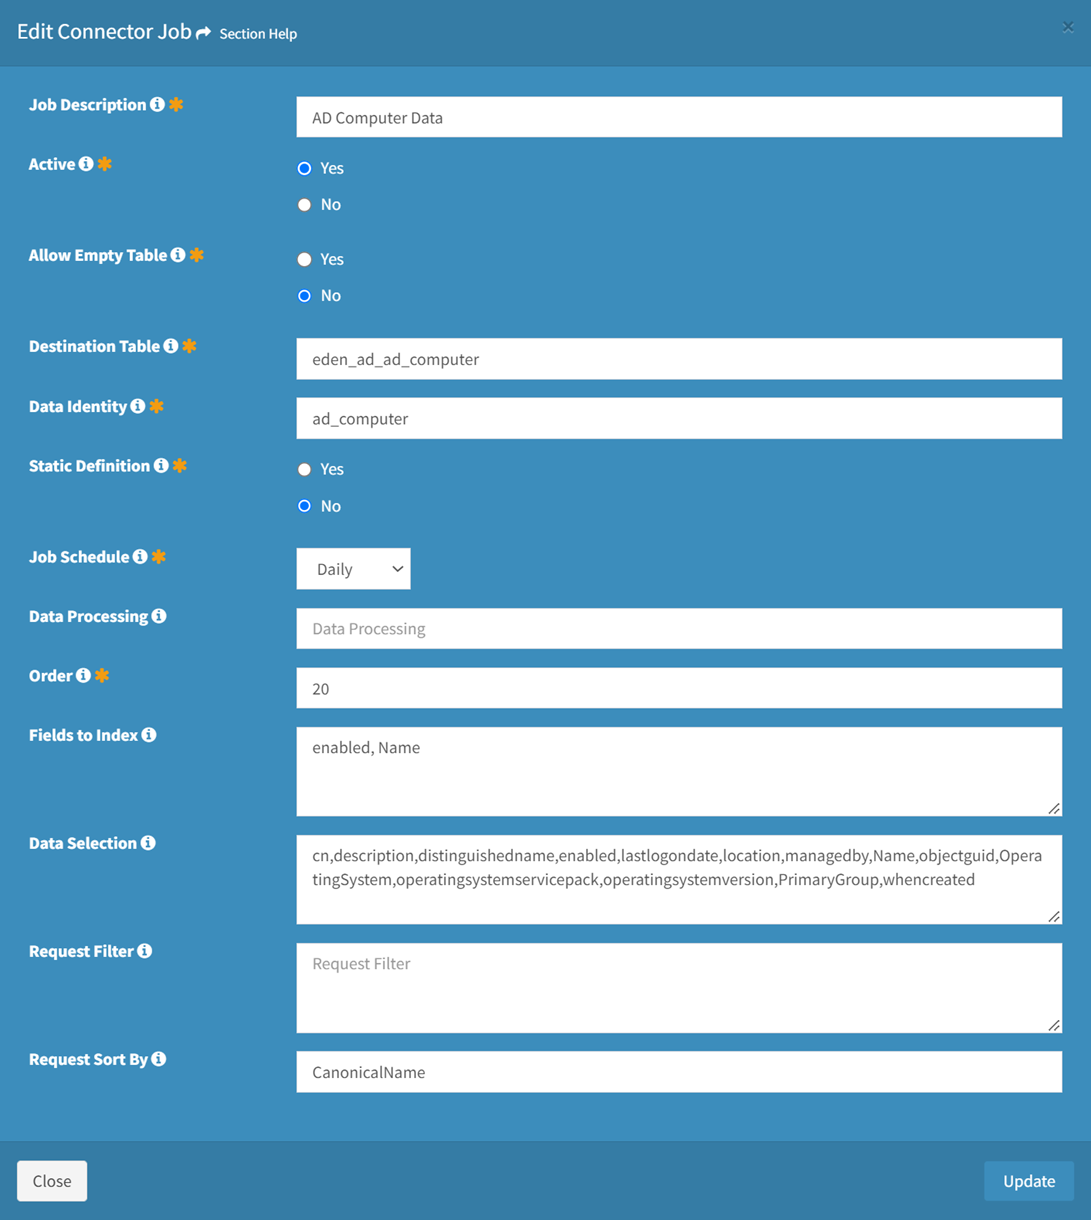
- Job Description – Description of the job (required)
- Active – Choose if job is active (required)
- Allow Empty Table – Choose if an empty table is allowed (required)
- Destination Table – Name of the destination table (e.g., my_table_cm_computer) (required)
- Data Identity – Identity of the data for dashboards (e.g., cm_computer) (required)
- AD – Identify data to query from a table
- Static Definition – Choose if the table definition is static (required)
- Job Schedule – Choose the frequency the job will run
- Weekly
- Daily
- Hourly
- Custom
- Data Processing – Processing of the data (optional)
- Future field to be used for running a process against data
- Order – Choose the order the job will run at the designated frequency (required)
- Fields to Index – Fields to index (optional)
- Data Selection – Connector specific data selection command of the job (optional)
- Request Filter – Fields to filter from the job (AD only) (optional)
- Request Fields – Fields requested by the job (ServiceNow only) (optional)
- Request Sort By – Field to sort the job by (AD only) (optional)
- Request Limit – Request limit of the job (Druva, ServiceNow and CrashPlan only) (optional)
- Click the Update button when finished to update the job. Click the Close button to cancel the operation.
Delete Job
Deleting jobs is not currently supported.
NOTE: Contact ReadyWorks Support to delete jobs.